Quinto gives you flexibility in how you manage job collaboration. You can invite collaborators job by job or assign them at the group level. This article walks through each workflow in order. You could also use both approaches, involving some people in every job in a group and others only as needed.
Workflow 1: Inviting collaborators to each job individually
If you only want to involve specific people on a single job, you can add them directly to the job. This is useful for cases where collaborators don’t need access to other jobs in the group.
Step 1: Preparation
As an admin (or someone who has permission to manage jobs), create a new job description. All jobs start out automatically in the Preparation step. You can work on the job privately to get a first draft ready for review. Follow the steps below to add collaborators to the job:
-
Click the people icon in the toolbar to open the collaborators side panel.
-
Click + Add people.
-
Click + Add under a role.
-
Search for and select a user. Only users with the Collaborate on jobs permission appear.
-
Click Add.
-
Click Invite to send invitations. Continue to step 3.
-
Click Skip for now if you’re not ready to send invitations. Continue to step 2.
-
If you want to involve a publisher, you’ll need to add them at the group level by following the steps in workflow 2.
Step 2: Collaboration
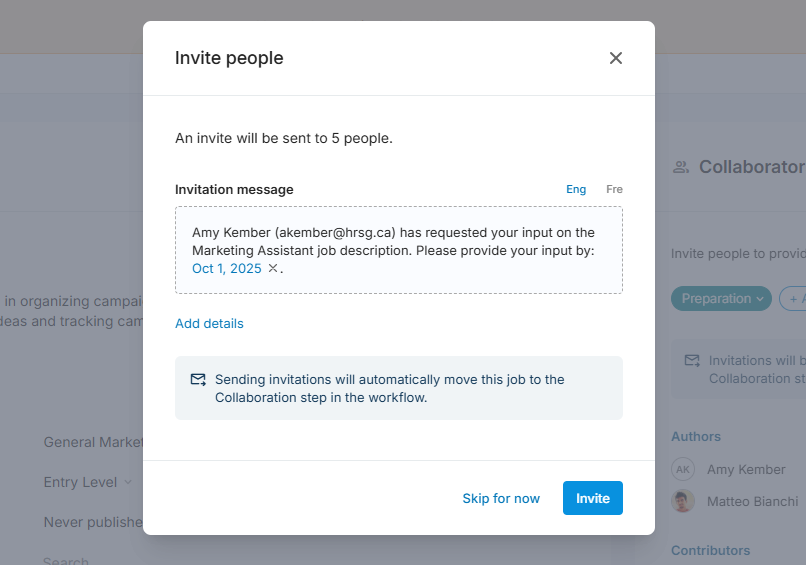
When you’re ready for collaborators to provide their input, move the job into the Collaboration step. Doing so automatically sends invitations to all reviewers, contributors, and authors. (If invitations were already sent in step 1, the job is already in the Collaboration step.)
In this step, collaborators can edit the job (based on their role), add comments, share feedback, and sign off once they think the job is ready to publish. Follow these steps to move a job into the Collaboration step:
-
Click the people icon in the toolbar to open the collaborators side panel.
-
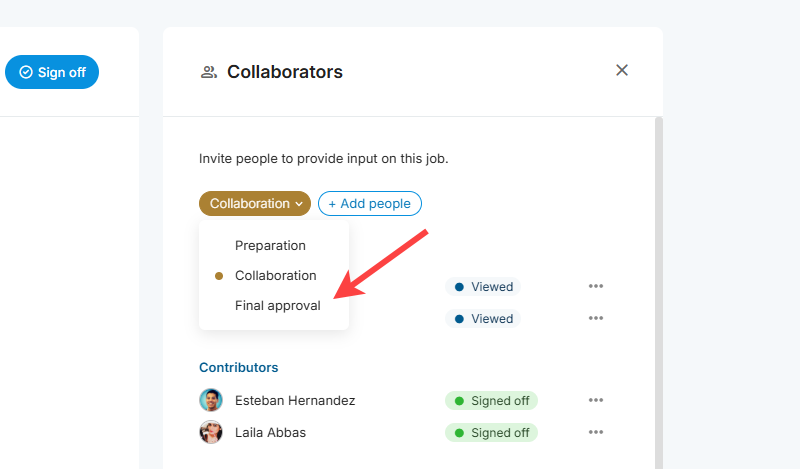
Click Preparation and select Collaboration in the dropdown.
-
Click Select date to add an optional due date.
-
Click + Add more details to add a message. This will be included in the email.
-
Click Move.
The due date is only a communication tool. Collaborators still have access after the due date. To prevent further edits, move the job from Collaboration to Final approval.
Step 3: Final approval
Authors or anyone with permission to manage jobs can move the job manually into the Final approval step. If there’s a job group publisher, they’ll receive an invitation. During this step, other collaborators can still view the job, but they can no longer make changes or add comments. Follow the steps below to move the job into the Final approval step:
-
Click the people icon in the toolbar to open the collaborators side panel.
-
Click Collaboration and select Final approval in the dropdown.
-
Click Select date to add an optional due date.
-
Click + Add more details to add a message. This will be included in the email.
-
Click Next. Optionally add your own feedback and signoff.
-
Click Move.
Final approval isn’t required; you can publish the job directly from Collaboration.
Workflow 2: Assigning collaborators to job groups
Adding collaborators at the group level is useful if you know the same people will always need access to every job in that group. This saves time since you won’t need to add them to each job one by one. These collaborators will automatically appear on all jobs in the group, though they won’t receive invitations until you move a job into the Collaboration step or send invitations manually.
-
Click Jobs in the top nav.
-
Click Manage on the top right of the page.
-
Select Groups in the dropdown.
-
Click the name of a group in the table.
-
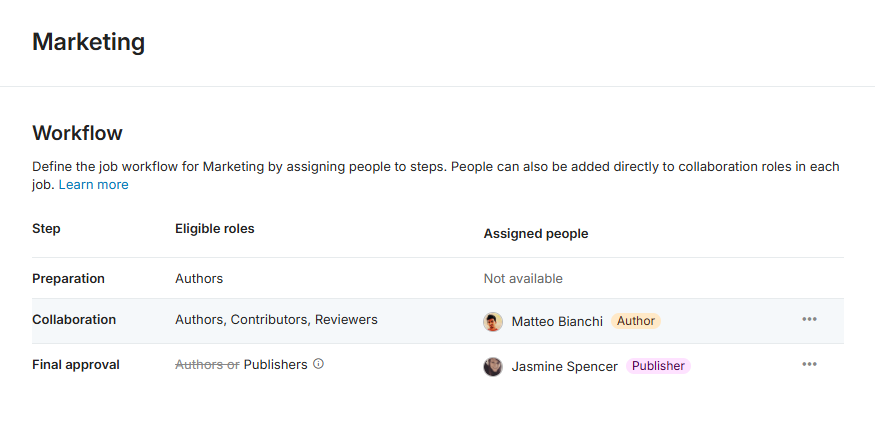
Click the 3-dot icon in the Collaboration row (or Final approval for publishers).
-
Select Manage people in the dropdown.
-
Search for and select a user. Only users with the Collaborate on jobs permission appear.
-
Select their role and click Save.
Step 1: Preparation
Just like workflow 1, you can start the process by creating a new job. Unlike workflow 1, collaborators have been added automatically based on the job group, so they don’t need to be added here.
Step 2: Collaboration
Just like in workflow 1, move the job into Collaboration to send invitations to collaborators.
Step 3: Final approval
Just like in workflow 1, authors or anyone with permission to manage jobs can move the job manually into the Final approval step. The publisher is notified that the job is ready for their review. Once they’ve made their desired edits, the publisher can move the job back into the Collaboration step or publish the job.
Managing collaboration across multiple jobs
Available on Plus and Compliance plans.
As we’ve described already, you can open a job and click the collaborators icon to access the collaborators table. There are also two other areas where you can manage collaboration:
Draft jobs table
Use the draft jobs table when you need to adjust collaboration on several jobs at once. This view gives you quick access to manage collaborators directly from the job list without opening each job individually.
-
Click Jobs in the top nav.
-
Click Manage on the top right of the page.
-
Select Draft jobs in the dropdown.
-
Click the 3-dot icon next to a job.
-
Select Manage in the dropdown.
Collaborators table
The Collaborators table is best for managing one person’s involvement across multiple jobs. This is helpful if you need to update roles or remove someone from several jobs at once.
-
Click Jobs in the top nav.
-
Click Manage on the top right of the page.
-
Select Collaborators in the dropdown.
Available actions
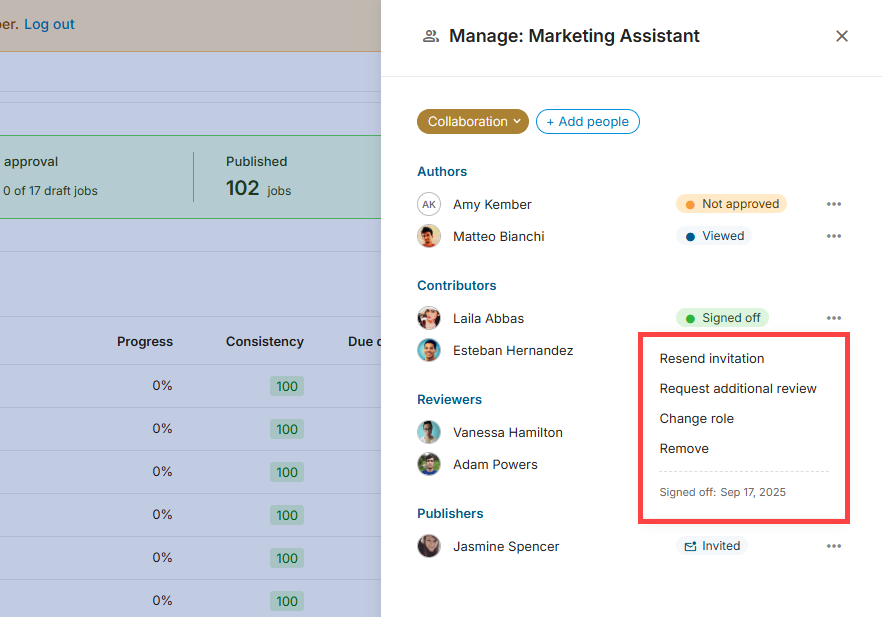
Once the side panel or table is open, you can perform these actions on individual collaborators. Each option is available from the 3-dot icon next to a collaborator.
-
Send invitation: If you skipped sending invites when moving the job to Collaboration, you can send them individually. This is useful if you want to notify one collaborator at a time.
-
Resend invitation: If a user’s status hasn’t changed from invited to viewed, you can resend the invite. This ensures collaborators don’t miss their chance to provide input.
-
Request additional review: Sometimes you may need a collaborator to revisit a job they’ve already signed off on. Use this option to request an additional review, which sends the collaborator an email notification.
-
Change role: If a collaborator’s responsibilities change, you can change their role on a job. The user receives an email letting them know about the update.
-
Remove: If someone no longer needs access to a job, you can remove them (their contributions will remain). They’ll receive an email notification and they’ll no longer have access to the job.