Available on Compliance plans
Meet compliance requirements by requesting employees to sign off on the job descriptions you’ve built and customized. Signoffs are managed on the job template, meaning you can enable signoff for some jobs but not others if you use multiple templates. Follow the steps below to turn on signoff and configure the settings to suit your organization’s needs.
Step 1. Turning on signoff
Enabling signoff allows you to send requests for jobs using that template. Since signoff is a manual process, turning it on won’t trigger automatic emails. If you turn off signoff, any requested signoffs will be canceled, and associated expiry dates will be removed from current signoffs.
-
Click the gear icon on the top right of your screen.
-
Select General administration in the drop-down.
-
Click Job templates under Features in the side menu.
-
Click the Job descriptions template.
-
Click Job signoffs to open the side panel.
-
Turn on the toggle at the top of the panel.
-
Click Confirm to enable signoffs.
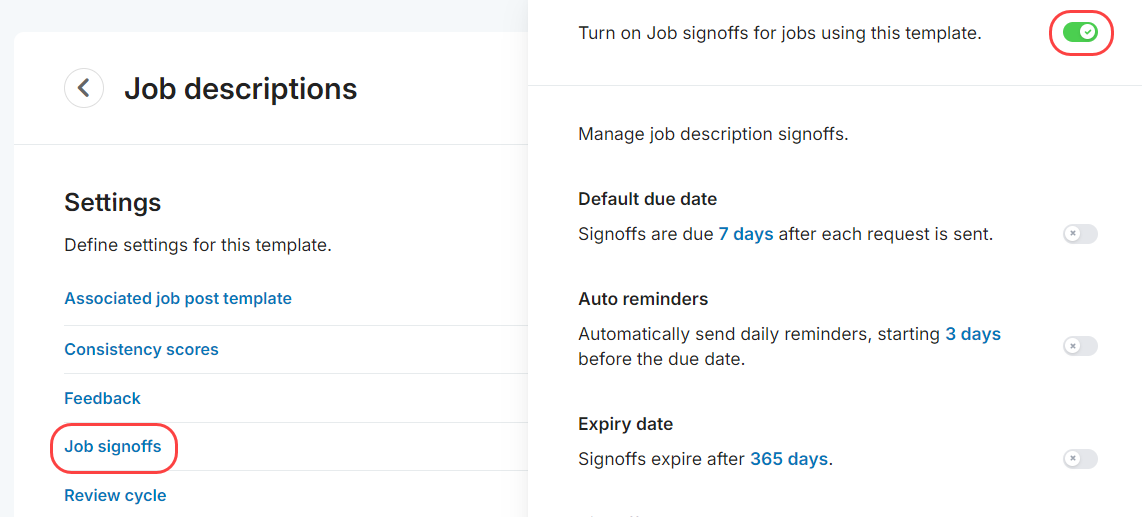
Make sure to enable signoff before assigning users to jobs or publishing them. Users already linked to published jobs won’t appear in the signoff table retroactively—the setting needs to be active beforehand.
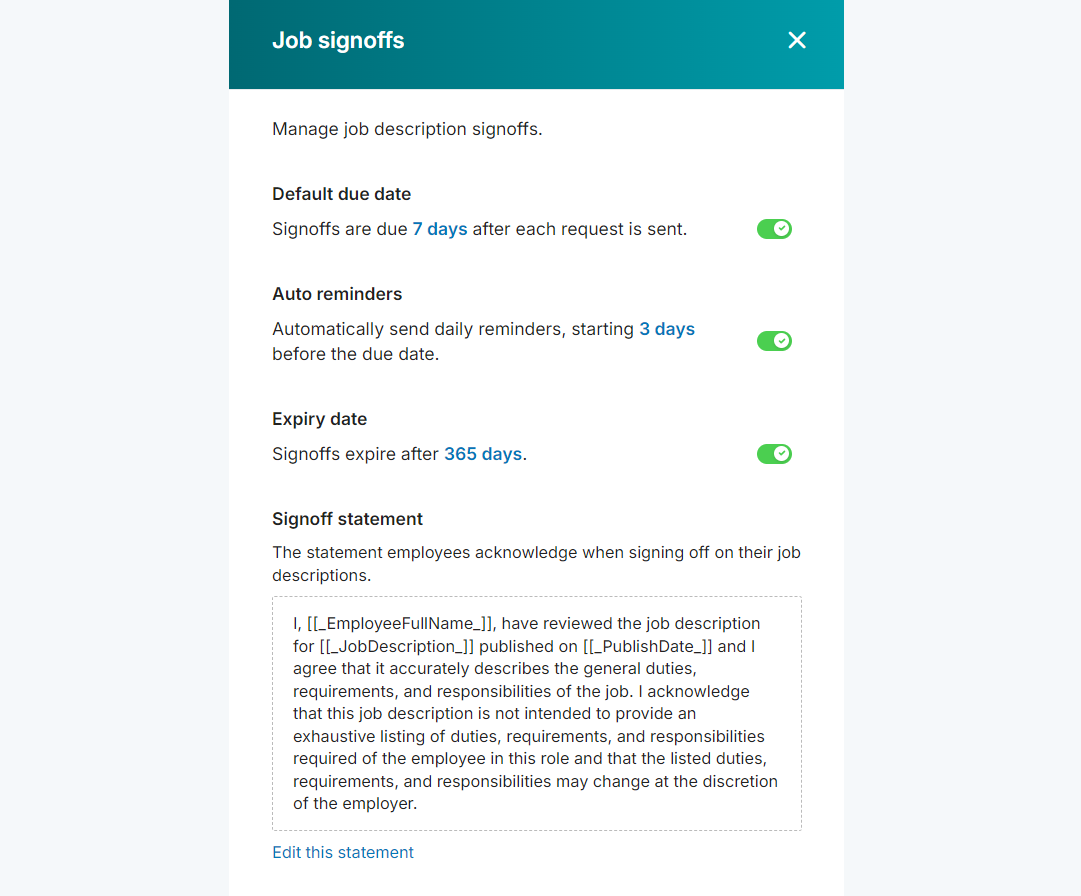
Step 2. Setting the default due date
Due dates help you manage the signoff process by showing who is overdue and allowing you to send reminders. You can override the default due date when sending requests to account for holidays or special events. Turning the due date on or off and changing the number of days only affects new requests with a To Do status.
-
Click the gear icon on the top right of your screen.
-
Select General administration in the drop-down.
-
Click Job templates under Features in the side menu.
-
Click the Job descriptions template.
-
Click Job signoffs to open the side panel.
-
Turn on the Default due date setting.
-
Click 7 days to adjust the number.
Step 3. Add auto reminders
To promote prompt follow-up, enable automatic reminders. These emails are sent at 10 AM EST, based on the number of days you set before the due date.
-
Click the gear icon on the top right of your screen.
-
Select General administration in the drop-down.
-
Click Job templates under Features in the side menu.
-
Click the Job descriptions template.
-
Click Job signoffs to open the side panel.
-
Turn on the Auto reminders setting.
-
Click 3 days to adjust the number.
Step 4. Setting the expiry date
Expiry dates are useful for setting up a recurring signoff cycle, such as requiring employees to acknowledge their job descriptions annually. Turning the expiry date only applies to To Do and Requested signoffs. Turning the setting off deletes expiry dates for all unexpired signoffs. Changing the number of days only affect To Do and Requested signoffs, not those already marked Current or Expired.
-
Click the gear icon on the top right of your screen.
-
Select General administration in the drop-down.
-
Click Job templates under Features in the side menu.
-
Click the Job descriptions template.
-
Click Job signoffs to open the side panel.
-
Turn on the Default due date setting.
-
Click 365 days to adjust the number.
Step 5. Customizing the signoff statement
The signoff statement is the declaration employees agree to stating that they’ve reviewed their job description and acknowledge its accuracy. The statement is displayed below the job and alongside the Submit button on the signoff task. A default statement is provided, but you can customize it. Changes to the statement only affect new requests with a To Do status.
-
Click the gear icon on the top right of your screen.
-
Select General administration in the drop-down.
-
Click Job templates under Features in the side menu.
-
Click the Job descriptions template.
-
Click Job signoffs to open the side panel.
-
Click Edit this statement.
-
Make your changes and click Save.